
Replacing clutch on Honda TRX 400EX ATV
ATV Tuesday, January 3, 2023
The Honda TRX 400EX is a reliable and powerful ATV, but even the best machines will eventually need maintenance. One common repair on the TRX 400EX is replacing the clutch. Here is a step-by-step guide on how to replace the clutch on your Honda TRX 400EX:
- Before beginning the repair, gather all the necessary tools and parts. You will need a new clutch kit, which should include clutch plates, springs, and a pressure plate. You will also need a hydraulic jack and stands, a socket set, a torque wrench, and a clutch tool.
- Use the hydraulic jack to lift the ATV off the ground and secure it on the stands. This will give you easy access to the underside of the vehicle.
- Locate the skid plate and exhaust pipe on the underside of the ATV. These will need to be removed in order to access the clutch. Use the socket set to loosen and remove the bolts securing these components.
- Once the skid plate and exhaust pipe are removed, you will have access to the clutch. Locate the clutch cable, which runs from the clutch lever to the clutch basket. Use a socket or wrench to loosen the cable adjuster, and then gently pull the cable out of the lever.
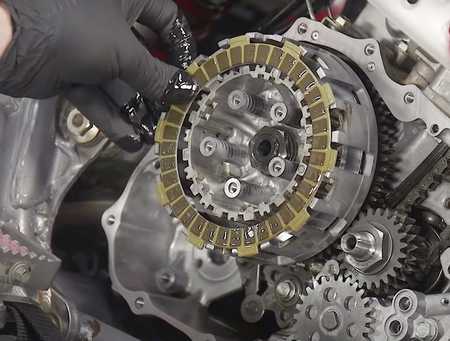
- With the cable disconnected, you can now remove the pressure plate and clutch basket. The pressure plate is located on the right side of the engine and is held in place with bolts. Use the clutch tool to remove the pressure plate and clutch basket as a unit.
- With the pressure plate and clutch basket removed, you will be able to access the old clutch plates and springs. Remove these components and discard them.
- Take the new clutch plates and springs from the clutch kit and install them in the clutch basket. Be sure to follow the manufacturer's instructions for the proper arrangement and installation of the clutch plates.
- Once the new clutch plates are installed, reassemble the pressure plate and clutch basket. Use the torque wrench to tighten the bolts to the proper specification, as indicated in the manufacturer's manual.
- With the pressure plate and clutch basket reassembled, it's time to reconnect the clutch cable. Slide the cable back into the lever, and then use the socket or wrench to adjust the cable tension to the proper specification.
- Replace the skid plate and exhaust pipe, using the socket set to tighten the bolts to the proper specification.
- Once all the components are reinstalled, lower the ATV off the jack stands and test the clutch to ensure it is functioning properly.
Replacing the clutch on a Honda TRX 400EX requires some mechanical knowledge and a bit of elbow grease, but it is a repair that can be done in a home garage with the right tools and some patience. Just be sure to follow these steps carefully and double check your work to ensure a successful repair.
![]()
![]()


